AMBA AHB · Module 12
AHB-Lite vs Full AHB
A precise tabulation of exactly what AHB-Lite keeps and drops versus full AHB — dropped: the arbiter, HBUSREQ/HGRANT, HMASTER, HLOCK, and SPLIT/RETRY (the multi-master machinery); kept identical: the pipeline, transfer types, bursts, sizes, wait states, and OKAY/ERROR. Same transfer engine, different master support; right-size to the master count.
This closes Module 12 by consolidating everything into one precise comparison: exactly what AHB-Lite keeps and drops versus full AHB. The whole module reduces to a single clean statement: AHB-Lite drops the multi-master machinery and keeps the full transfer. Dropped (the multi-master layer): the arbiter, HBUSREQ/HGRANT, HMASTER, HLOCK/locked transfers, and the SPLIT/RETRY responses. Kept identical (the transfer engine): the two-phase pipeline, all transfer types (HTRANS), bursts (HBURST), sizes (HSIZE), wait states (HREADY), and the OKAY/ERROR responses. So a transfer is bit-for-bit identical in both — only the surrounding arbitration differs. And the practical guidance: choose by master count — one master → AHB-Lite; a few (CPU + DMA) → a bus matrix of AHB-Lite ports; many → AXI. This chapter is the reference table and decision guide that ties the module together.
1. What Is It?
This chapter is the precise tabulation of AHB-Lite versus full AHB — what's dropped, what's kept, and how to choose. The comparison:
| Feature | Full AHB | AHB-Lite |
|---|---|---|
| Masters | multiple | one |
| Arbiter | yes | no |
| HBUSREQ / HGRANT | yes | no |
| HMASTER | yes | no |
| HLOCK / locked transfers | yes | implicit (free) |
| Responses (HRESP) | OKAY / ERROR / SPLIT / RETRY | OKAY / ERROR |
| Two-phase pipeline | yes | same |
| HTRANS / HBURST / HSIZE | yes | same |
| Wait states (HREADY) | yes | same |
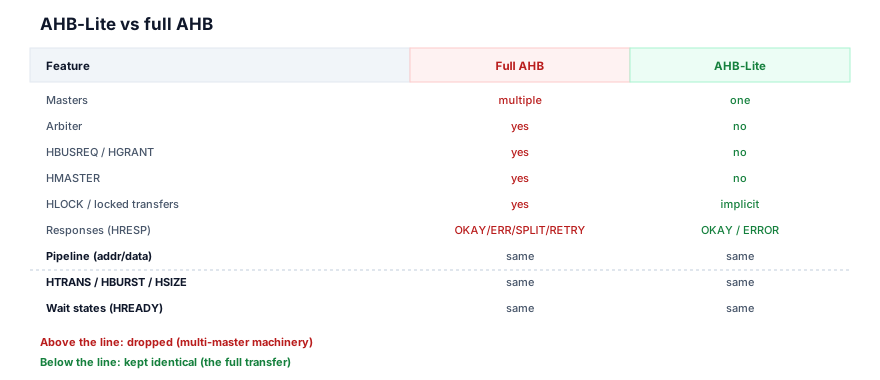
So the comparison splits AHB cleanly into two layers: the multi-master layer (arbiter, request/grant, HMASTER, locks, SPLIT/RETRY) — dropped by AHB-Lite — and the transfer layer (pipeline, transfer types, bursts, sizes, wait states, OKAY/ERROR) — kept identical. There's no third category: every AHB feature falls cleanly into "multi-master (dropped)" or "transfer (kept)." This is the consolidated view of the whole module — AHB-Lite is full AHB with the multi-master layer removed. So this chapter is the reference that makes the keep/drop boundary precise and gives the master-count decision guide.
2. Why Does It Exist?
This consolidating comparison exists because the clean two-layer split — multi-master vs transfer — is the unifying insight of the whole module, and stating it precisely (as a table plus a decision guide) is what makes AHB-Lite actionable: you know exactly what you get, what you give up, and when to use it.
The two-layer split is the unifying insight: across Module 12, every simplification was an instance of one principle — remove the multi-master layer, keep the transfer layer. The arbiter (multi-master) goes; the pipeline (transfer) stays. Request/grant (multi-master) goes; bursts (transfer) stay. SPLIT/RETRY (multi-master bus-management) go; wait states (transfer) stay. So the entire module is the application of this single split. The comparison chapter makes the split explicit — it's the lens that organizes everything. So this chapter exists to state the unifying principle precisely: AHB cleanly decomposes into a transfer layer and a multi-master layer, and AHB-Lite is the transfer layer alone. So it consolidates the module into one idea.
The precise boundary makes it actionable: to use AHB-Lite confidently, you need to know exactly what's kept and dropped — no ambiguity. The table gives that: you know your transfers are full-featured (pipeline, bursts, wait states, OKAY/ERROR) and you know you've given up multi-master support (arbiter, grant, locks, SPLIT/RETRY). So you can reason precisely: "AHB-Lite gives me full transfer performance; it costs me multi-master capability." So the precise boundary turns AHB-Lite from a vague "simpler AHB" into a known quantity. So the comparison exists to make the trade exact.
The decision guide makes it practical: knowing what AHB-Lite is isn't enough — you need to know when to use it. The master-count guide answers this: one master → AHB-Lite; a few → bus matrix; many → AXI. So the chapter pairs the what (the table) with the when (the decision guide), making AHB-Lite practically deployable. So this consolidating comparison exists to (1) state the unifying two-layer split (the module's core insight), (2) make the keep/drop boundary precise (so the trade is exact), and (3) give the master-count decision guide (so you know when to use it). It's the chapter that turns the module's understanding into actionable engineering judgment — the reference you'd actually consult when choosing a bus. So it exists as the consolidation and the decision aid.
3. Mental Model
Model the AHB-Lite/full-AHB comparison as a manual car versus an automatic with the same engine — the engine, transmission ratios, and road performance are identical (the transfer layer); what differs is only the clutch-and-gearstick machinery for managing multiple gear changes by hand (the multi-master layer) — an automatic (AHB-Lite) drops the clutch and stick because, for its use case, that manual control isn't needed, but it drives the same roads at the same speed.
Two cars share the same engine and drivetrain — same power, same gear ratios, same top speed and acceleration (the transfer layer: identical pipeline, bursts, speed). The manual car (full AHB) adds the clutch pedal and gearstick machinery — the apparatus for manually managing gear changes (the multi-master layer: the arbiter, request/grant, locks — the machinery for managing which master, when). The automatic car (AHB-Lite) drops the clutch and stick — for its use case (ordinary driving, one driver who doesn't need manual gear control), that machinery is unnecessary complexity. But — and this is the key point — the automatic drives the same roads at the same speed with the same engine; you give up manual gear control, not performance. And the choice is by use case: need fine manual control for many scenarios (a race, multiple complex demands) → manual (full AHB / many masters); ordinary single-purpose driving → automatic (AHB-Lite / one master); a high-performance need → a different class of car entirely (AXI). Same engine, different control machinery, chosen by need.
This captures the comparison: the shared engine/drivetrain = the transfer layer (pipeline, bursts, speed — identical); the clutch-and-stick machinery = the multi-master layer (arbiter, grant, locks — dropped by AHB-Lite); the automatic dropping the clutch = AHB-Lite removing the multi-master machinery; same roads, same speed = identical transfer performance; choosing by use case = choosing by master count. Same engine, different control machinery — pick by your driving needs.
Watch the one observable difference — and what's identical:
Identical transfer; full AHB has a grant-wait lead-in, AHB-Lite doesn't
4 cyclesThe model's lesson: same engine, different control machinery. In the waveform, the transfer (from NONSEQ onward) is identical; only full AHB's grant-wait lead-in (the arbitration machinery) differs — AHB-Lite just drives.
4. Real Hardware Perspective
In hardware, the comparison is a clean accounting of what logic exists in each: full AHB has the arbiter, grant network, HMASTER routing, lock logic, master-side muxing, and slave SPLIT/RETRY machinery; AHB-Lite has none of these — just the decoder, the read-data/response mux, and the transfer datapath that both share.
The shared transfer datapath is identical in both: the master's address/control outputs (HADDR, HWRITE, HTRANS, HSIZE, HBURST), the data buses (HWDATA/HRDATA), the HREADY/HRESP handling, and the slave's address-phase-sample / data-phase-respond logic (chapter 12.6) — all the same in AHB-Lite and full AHB. A slave's transfer logic doesn't change between them (only its SPLIT/RETRY machinery, which AHB-Lite slaves omit). So the transfer hardware is common. So in hardware, the engine is shared.
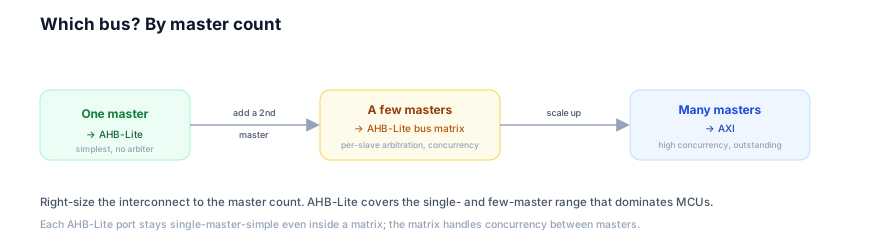
The full-AHB-only hardware is the multi-master layer: the arbiter block, the HBUSREQ/HGRANT network, HMASTER generation/routing, HLOCK handling, the master-side address/control mux (selecting which master drives), and slave SPLIT/RETRY machinery (including HSPLIT). None of this exists in AHB-Lite. So full AHB's extra hardware is exactly the multi-master layer. So in hardware, the difference is this block-level addition (full AHB) or absence (AHB-Lite). So the comparison is a clean hardware accounting: shared transfer datapath + (full AHB only) multi-master machinery.
The scaling hardware (Figure 3) shows the options: for one master, AHB-Lite's interconnect is just a decoder + return mux. For a few masters, a bus matrix of AHB-Lite ports adds per-slave arbiters and cross-routing (but keeps each port's interface single-master-simple). For many masters, AXI's more complex fabric (separate channels, outstanding transactions). So the hardware scales with master count, and the comparison places AHB-Lite (single bus or matrix) in the low-to-mid range. So in hardware, the comparison is: a shared transfer datapath, with full AHB adding the multi-master machinery on one bus, AHB-Lite omitting it (single bus) or composing into a matrix (a few masters), and AXI for the high end. The hardware difference is precisely the multi-master layer.
5. System Architecture Perspective
At the system level, the comparison crystallizes the right-sizing principle and the protocol-family structure — AHB-Lite and full AHB are two points on a complexity spectrum (with AXI beyond), and choosing among them is a core architectural decision driven by master count and concurrency needs.
The right-sizing principle is the headline: the comparison makes vivid that you should match the protocol to the system's actual master count. Using full AHB for a single-master system over-provisions (paying for the multi-master layer you never use); using AHB-Lite for a genuine multi-master system under-provisions (it can't coordinate masters). The right choice is the simplest protocol that meets the need: AHB-Lite for one master, a matrix for a few, AXI for many. So the comparison teaches the right-sizing discipline — don't over- or under-provision the interconnect. So at the system level, the comparison is a lesson in matching complexity to need.
The protocol-family structure is the second insight: AHB-Lite, full AHB, and AXI form a family — a spectrum of increasing multi-master capability and complexity, sharing transfer concepts (addresses, data, responses, bursts). AHB-Lite is the simple, single-master end; full AHB adds multi-master on a shared bus; AXI adds high-concurrency, outstanding transactions, separate channels. Understanding the comparison places AHB-Lite within this family — you see it's not an isolated protocol but the base of a scaling story. So the comparison situates AHB-Lite in the AMBA family. This helps an architect reason about evolution: a design might start AHB-Lite, grow to a matrix, and a successor might move to AXI — a natural progression along the family. So at the system level, the comparison reveals the protocol-family spectrum.
The decision-making leverage rounds it out: the comparison + decision guide is a practical tool for the most common interconnect decision an embedded architect faces — "what bus for this design?" The answer follows from master count and concurrency: one master, modest needs → AHB-Lite (and you know exactly what you get from the table); a CPU + DMA → AHB-Lite bus matrix; many masters / high throughput → AXI. So the comparison directly informs real architectural choices. So at the system level, the AHB-Lite-vs-full-AHB comparison is more than a table — it's the crystallization of the right-sizing principle, the placement of AHB-Lite in the AMBA protocol family (the AHB-Lite → full AHB → AXI spectrum), and a practical decision tool for interconnect selection. It's the consolidated judgment the whole module builds toward: understand the two layers (transfer vs multi-master), know AHB-Lite is the transfer layer alone, and choose by master count. So the comparison is the actionable summit of Module 12. With it, you can both explain AHB-Lite precisely and decide when to use it.
6. Engineering Tradeoffs
The comparison embodies the right-sized-protocol decision.
- AHB-Lite vs full AHB. AHB-Lite: simplest, single-master, full transfer performance, much less logic/verification — but no multi-master support. Full AHB: multi-master on a shared bus — but more complex, serializes masters. Choose by whether you have one master or several sharing a bus.
- Same transfer, different arbitration. Both share the identical transfer engine (pipeline, bursts, wait states, OKAY/ERROR); they differ only in the multi-master layer. So the choice never costs transfer performance — only multi-master capability.
- AHB-Lite matrix vs full AHB vs AXI for multiple masters. A bus matrix of AHB-Lite ports gives concurrency with simple ports; full AHB serializes masters on one bus; AXI scales to many masters with outstanding transactions. Match to master count and concurrency need.
- Right-sized vs over/under-provisioned. Pick the simplest protocol that meets the need (AHB-Lite for one, matrix for a few, AXI for many) — over-provisioning wastes area/power/verification; under-provisioning can't meet the need.
The throughline: AHB-Lite is full AHB minus the multi-master layer (arbiter, HBUSREQ/HGRANT, HMASTER, HLOCK, SPLIT/RETRY) and identical in the transfer layer (pipeline, HTRANS/HBURST/HSIZE, wait states, OKAY/ERROR) — so a transfer is bit-for-bit identical, and the choice between them costs only multi-master capability, never transfer performance. Choose by master count: one → AHB-Lite, a few → AHB-Lite bus matrix, many → AXI. The comparison crystallizes the right-sizing principle and places AHB-Lite in the AMBA protocol family.
7. Industry Example
Apply the comparison to real design decisions.
- A single-core MCU → AHB-Lite. One CPU master, needing fast code/data access and peripheral I/O. Master count: one. Decision: AHB-Lite — full transfer performance (pipelined fetch, bursts, wait states), no arbiter, minimal logic and verification. The table confirms you give up only multi-master support, which you don't need. (Chapter 12.5.)
- MCU + DMA → AHB-Lite bus matrix. Add a DMA engine: now two masters. A plain AHB-Lite bus can't coordinate them. Decision: a multi-layer AHB-Lite bus matrix — per-slave arbitration, concurrency (CPU and DMA on different slaves at once), each port still single-master-simple. You stayed in the AHB-Lite family, scaling via the matrix rather than jumping to full multi-master AHB or AXI.
- A few masters, modest sharing → full AHB or matrix. A design with, say, a CPU and a coprocessor sharing memory, with modest concurrency needs: a bus matrix (concurrency) or full multi-master AHB (simpler, serialized) both work. Choose based on whether concurrency is needed.
- A complex application SoC → AXI. Multiple CPU cores, a GPU, several DMAs, high throughput, many outstanding transactions: master count is high, concurrency demands are large. Decision: AXI at the top. AHB-Lite then appears only in single-master leaf subsystems (e.g. a peripheral subsystem behind an AXI-to-AHB bridge).
- Reasoning from the table. In each case, the decision follows from master count (and concurrency), and the table tells you exactly what each option provides — so you can justify the choice precisely ("one master, so AHB-Lite — full transfers, no arbitration overhead").
The examples show the comparison as a decision tool: master count drives the choice (one → AHB-Lite, a few → matrix, many → AXI), and the precise keep/drop table lets you reason about exactly what you get and give up. This is the practical payoff of the module — confident, right-sized interconnect selection.
8. Common Mistakes
9. Interview Insight
The comparison is a synthesizing interview topic — the two-layer split (transfer kept, multi-master dropped) and the master-count decision guide are the signals.
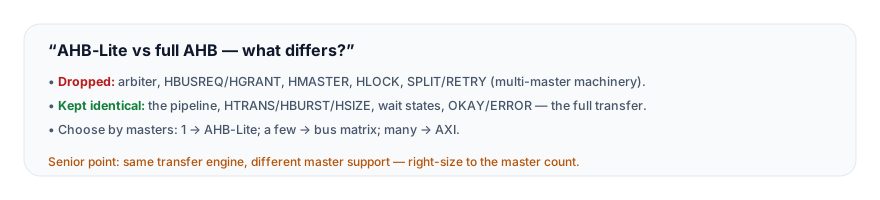
The answer that lands gives the two-layer split and the decision guide: "AHB-Lite is full AHB with the multi-master layer removed and the transfer layer kept identical. Dropped: the arbiter, the HBUSREQ/HGRANT request-grant handshake, HMASTER, locked transfers via HLOCK, and the SPLIT and RETRY responses — everything that exists to coordinate multiple masters. Kept bit-for-bit identical: the two-phase pipeline, all transfer types and burst types, all sizes, wait states via HREADY, and the OKAY/ERROR responses — the full transfer engine. So a transfer is identical in both; the only difference is multi-master support. That reframes the choice: it's a master-count question, not a transfer-capability one. You choose by how many masters share the bus: one master → AHB-Lite, the simplest, with full transfer performance and no arbitration overhead; a few masters, like a CPU plus a DMA → a multi-layer AHB-Lite bus matrix, which gives per-slave arbitration and concurrency while each port stays single-master-simple; many masters with high concurrency → AXI. So right-size the interconnect to the master count. A single-master system loses nothing by using AHB-Lite — it gets the full transfer engine without the unused multi-master machinery." The two-layer split, the identical-transfer point, and the master-count decision guide are the senior signals.
10. Practice Challenge
Reason from the comparison.
- The table. List what AHB-Lite drops and what it keeps, organized by the two layers.
- Identical transfer. Explain why a transfer is bit-for-bit identical in AHB-Lite and full AHB.
- Read the waveform. From Figure 2, identify what's identical and what differs (the lead-in).
- Decision guide. Give the master-count decision guide (one / a few / many) and the bus for each.
- Reframe. Explain why "AHB-Lite vs full AHB" is a master-count question, not a transfer-capability one.
11. Key Takeaways
- AHB-Lite is full AHB minus the multi-master layer — dropped: the arbiter, HBUSREQ/HGRANT, HMASTER, HLOCK/locked transfers, and SPLIT/RETRY.
- The transfer layer is kept identical — the two-phase pipeline, HTRANS/HBURST/HSIZE, wait states (HREADY), and OKAY/ERROR are bit-for-bit the same.
- A transfer is identical in both — so the choice between AHB-Lite and full AHB costs only multi-master capability, never transfer performance or features.
- It's a master-count decision, not a capability one — frame "AHB-Lite vs full AHB" as "do I need to coordinate multiple masters?", not "do I need fast/capable transfers?" (you get those either way).
- Choose by master count — one → AHB-Lite (simplest); a few (CPU + DMA) → an AHB-Lite bus matrix (concurrency, simple ports); many → AXI. Right-size the interconnect.
- AHB decomposes into two layers — a transfer layer and a multi-master layer; AHB-Lite is the transfer layer alone, and the AHB-Lite → full AHB → AXI spectrum is the AMBA family's increasing multi-master capability.
12. What Comes Next
This completes Module 12 — AHB-Lite. You now understand why AHB-Lite exists, the single-master simplification, removed arbitration, simplified responses, the typical microcontroller fabric, AHB-Lite slave design, and the precise comparison to full AHB. The next module turns from the protocol's structure to its performance:
- Module 13 — Performance (coming next) — turning the protocol into bandwidth and finding why a real system is slow: bandwidth, latency, outstanding depth, burst efficiency, and bottleneck analysis.
To revisit the AHB-Lite pieces this comparison consolidates, see Why AHB-Lite Exists, Single-Master Simplification, and Removed Arbitration.